A Peculiar Form of Torment
A possible future exchange on a popular TV game show:
I'll take Tedious Math Curricula for $200, Alex.
Answer: It's the Ontario mathematics course where half the expectations involve quadratic relations.
Question: What is Principles of Mathematics, Grade 10?
If you're a math teacher in Ontario, it's likely that at some point in your career, you've wondered whether your students – or you – could possibly make it through another day studying quadratics.
Another day of fitting curves to photos of a bridge:

Sipapu Natural Bridge
A stone bridge in central San Juan County, Utah, United States. Photo by Daniel Schwen, Wikimedia, with Desmos overlay by the author.
Or learning one more algebraic procedure to convert a relation in standard form:
...to its equivalent in vertex form:
You might even struggle to make it through, who knows, dressing up some drab review of quadratic relations by using a Jeopardy! template at the end of a unit of study.
We are, of course, beholden to the curriculum, old and flawed though it may be.1
At issue is that each of the tasks described above involve seat work where students primarily manipulate symbols on paper or on a computer. They are not particularly engaging or challenging. To boot, the Jeopardy! review activity introduces time pressure.
Given that we must work within a curriculum where the overemphasis on quadratics is a special form of torment for many students, what kind of tasks could we do instead?
What tasks might better activate the seven processes at the core of Ontario's math curriculum?
The Ball in a Can Challenge
In 2006 I had the opportunity to attend the Anja S. Greer Conference on Mathematics and Technology2 at Phillips Exeter Academy for the first time.
Larry Ottman led a weeklong session focused on getting students up, moving, taking measurements, and testing hypotheses in math class.
With his permission (and his reminder that the task did not originate with him) I will describe the Ball in a Can Challenge here.
It says something about me, perhaps, that from Larry's weeklong session, I've only retained this one activity. It's a pretty good one, though, and just about the only task I can think of where the class often ends with a scene like this:
Victory!
Students at Royal St. George's College celebrate.
As you see from the video – that's the task.
A ball bearing rolls from a ramp.
If the mathematics are sound, the ball lands in the can.
Simple, right? It can be. Let's dive in!
Apparatus
Here's what you need:
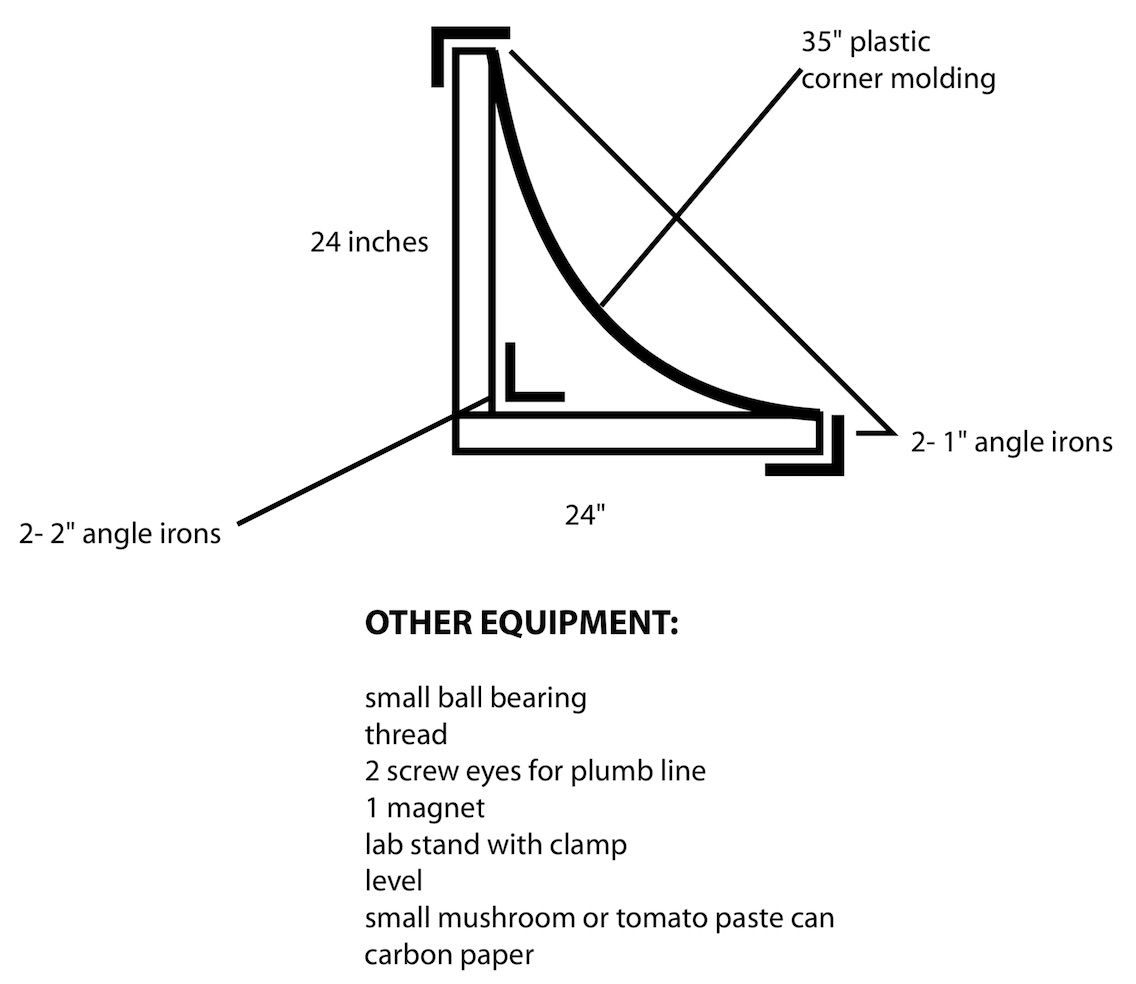
Building a Ramp
It takes some time to source materials and build the ramp, but after that initial investment, the activity is straightforward to set up in your classroom year after year. Diagram by Larry Ottman.
To build the ramp, use a couple of angle irons to join the lengths of 24-inch boards together. The boards are optimally just under an inch high and three inches wide:
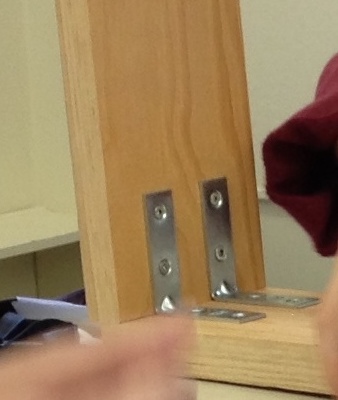
A strong join between the boards is helpful to be certain they remain perpendicular.
Once that's done, attach an angle-iron to the end of each board.
The plastic corner molding, or quarter-round, is placed between the angle irons on the board ends. This creates the curve that the ball bearing will roll down:

The angle-iron should sit just a bit above the board, so that the corner-molding can be squeezed in at each end.
On the bottom of the ramp (the end the ball will fall from) attach a screw eye.
Use thread (or lightweight fishing line) and attach it to the screw eye.
Attach the magnet (or a weight) to the thread. Ensure that the thread is long enough such that the weight hovers just an inch or so above the ground. The thread length will need adjustment based on where you choose to place the ramp in your classroom. A couple of desks, carefully stacked on top of one another, can work, or a ladder. The higher you are able to safely place the ramp, the more fun the activity tends to be. Measure the length of the plumb line accordingly. You're aiming for something like this:
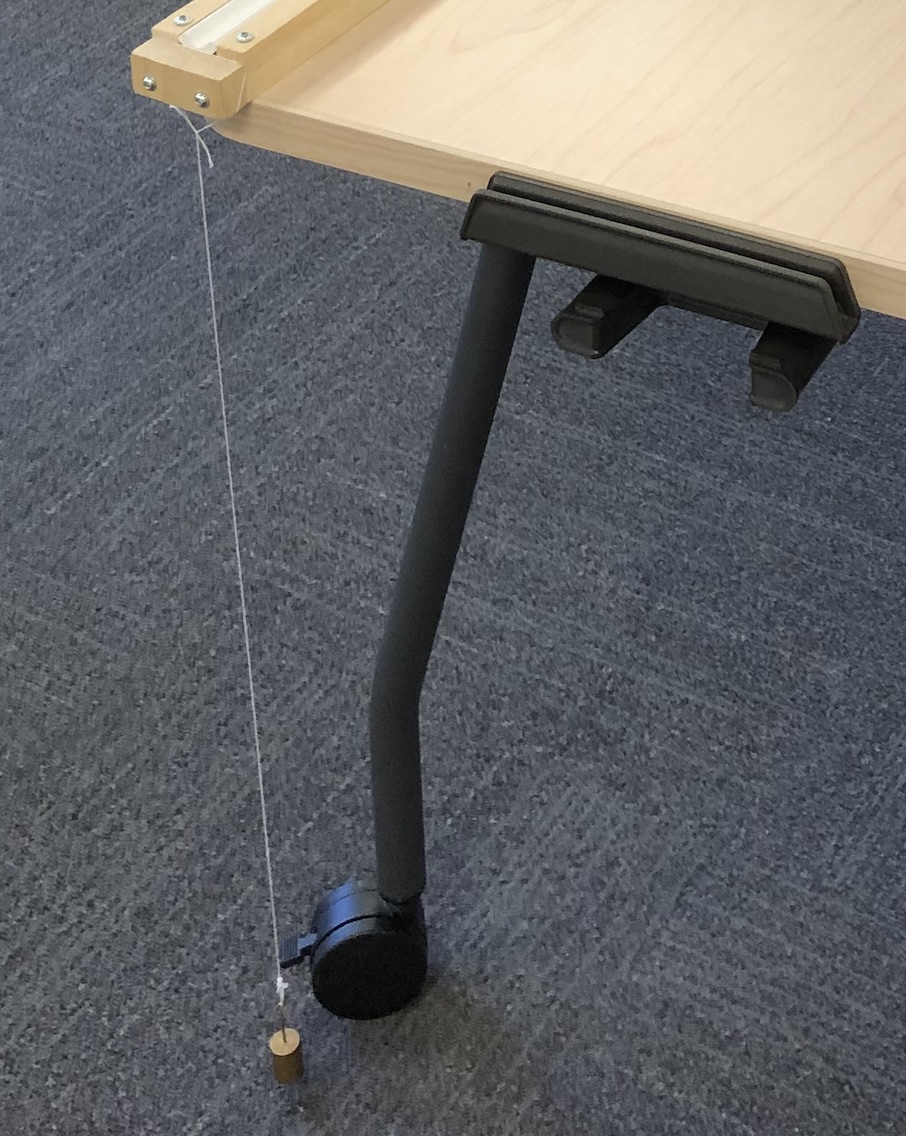
Here a weight borrowed from the Science department allows the plumb line to hang perpendicular to the floor.
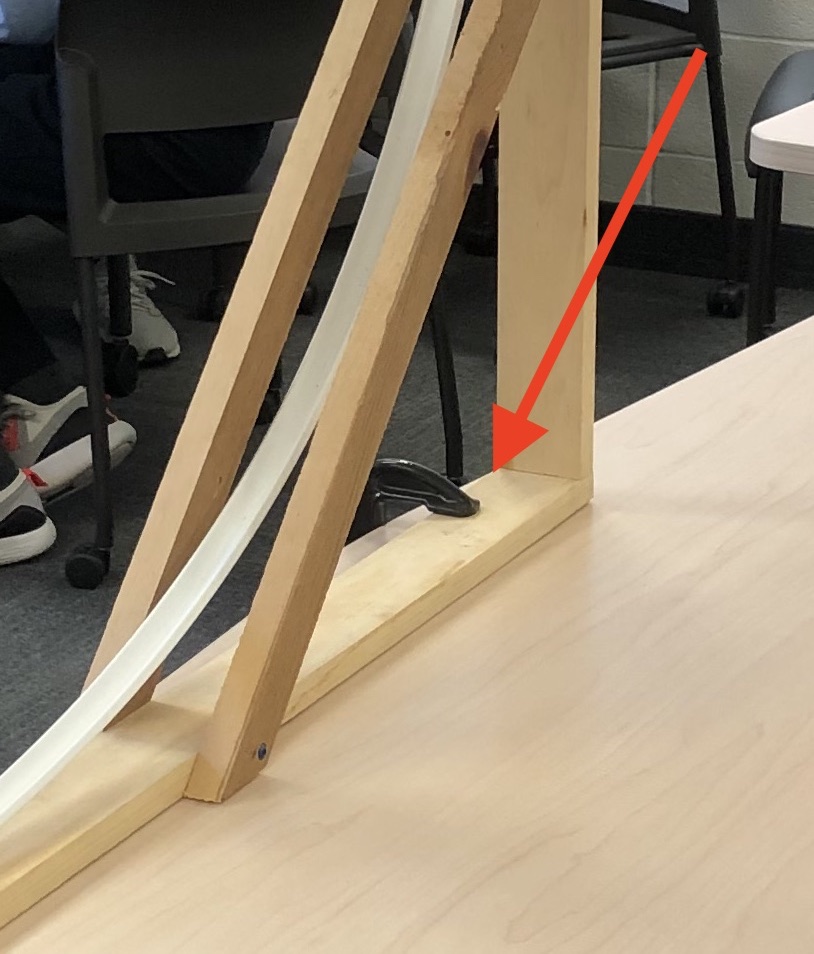
You'll note that the end of the ramp in this most recent photo is constructed a little differently. The main idea is that, however the ramp is built, you want two boards that remain firmly perpendicular to one another. The ramp must allow for stable placement of the corner molding and for suspension of the plumb line directly under the location where the ball bearing leaves the ramp.
When you set up the ramp to begin the activity, it's a good idea to use a C-clamp to secure it to the ladder or desk:
It's no fun at all if students carefully take measurements, perform their calculations, prepare to do the final drop, and then someone accidentally bumps the ramp – requiring the entire process to begin anew.
Setting the stage
How to prepare students?
I've most often run the Ball in a Can Challenge as a consolidation activity in a unit of study.
A group of twelve works well, with students mostly partnered and assigned specific roles. This table is adapted from the original by Larry Ottman:
| Role | Responsibilities | Number of students |
|---|---|---|
| Recorder | Writes down measurements, observes, makes suggestions. A quasi-leadership role. | One |
| Dropper | The person who actually drops the ball. Consistency of drop technique is important! 😅 | One |
| Carbon paper | When the dropper is ready, this team tapes down a sheet of paper on the floor so that the ball is dropping into the middle of the paper. Then they lay the carbon sheet over top of the paper and when the ball is dropped, it leaves a mark on the paper. The dropper continues dropping until they are in enough of a rhythm that they consistently hit the same location on the paper (within a dime's diameter is sufficient). Once students have the spot, they should mark this on the paper. Another tip – it can be helpful to have the carbon paper team number the drops on the paper (1, 2, 3...) which can help the dropper become consistent more easily. | Two |
| Floor measurement | This team measures the co-ordinates of the point where the ball hits the floor. If you want, you can tell students that the floor represents the horizontal axis, but in my experience, they will arrive at this conclusion themselves after some valuable conversation. | Two |
| Vertex measurement | This team measures the co-ordinates of the vertex (where the ball leaves the ramp). You may wish to tell the team they are measuring "where the ball leaves the ramp" and leave it up to them to, again, decide amongst themselves that this represents the vertex, and that it's on the vertical axis of the mathematical model. | Two |
| Can height | This team measures the height of the can above the ground. Some good discussion typically ensues when students debate whether to measure from the top or the bottom of the can. | Two |
| Can placement | This team is responsible for placing the can prior to the penultimate drop. | Two |
After measurements have been taken for the vertex and where the ball hits the ground, students can algebraically determine the missing value in the quadratic relation. I've had groups use both of these forms with success:
Or:
It's a good conversation to hear students decide on which equation to work with, and how that connects to the physical apparatus of the task.
I encourage students to be clear about the meaning of the independent and dependent variables. What does x represent, and what are its units? And so on. This can be a nudge in the right direction if you've noticed the two measurement teams working with different units.
Finally, once students have the complete equation that describes the path of the ball bearing, it doesn't take long to decide how they can use the can's height above the ground, and what this implies for their next steps.
It's worth noting that this entire task can run in a far more free-form manner.
I've had students work in groups as small as four, assign roles independently, and meet with success.
Here's another photo:
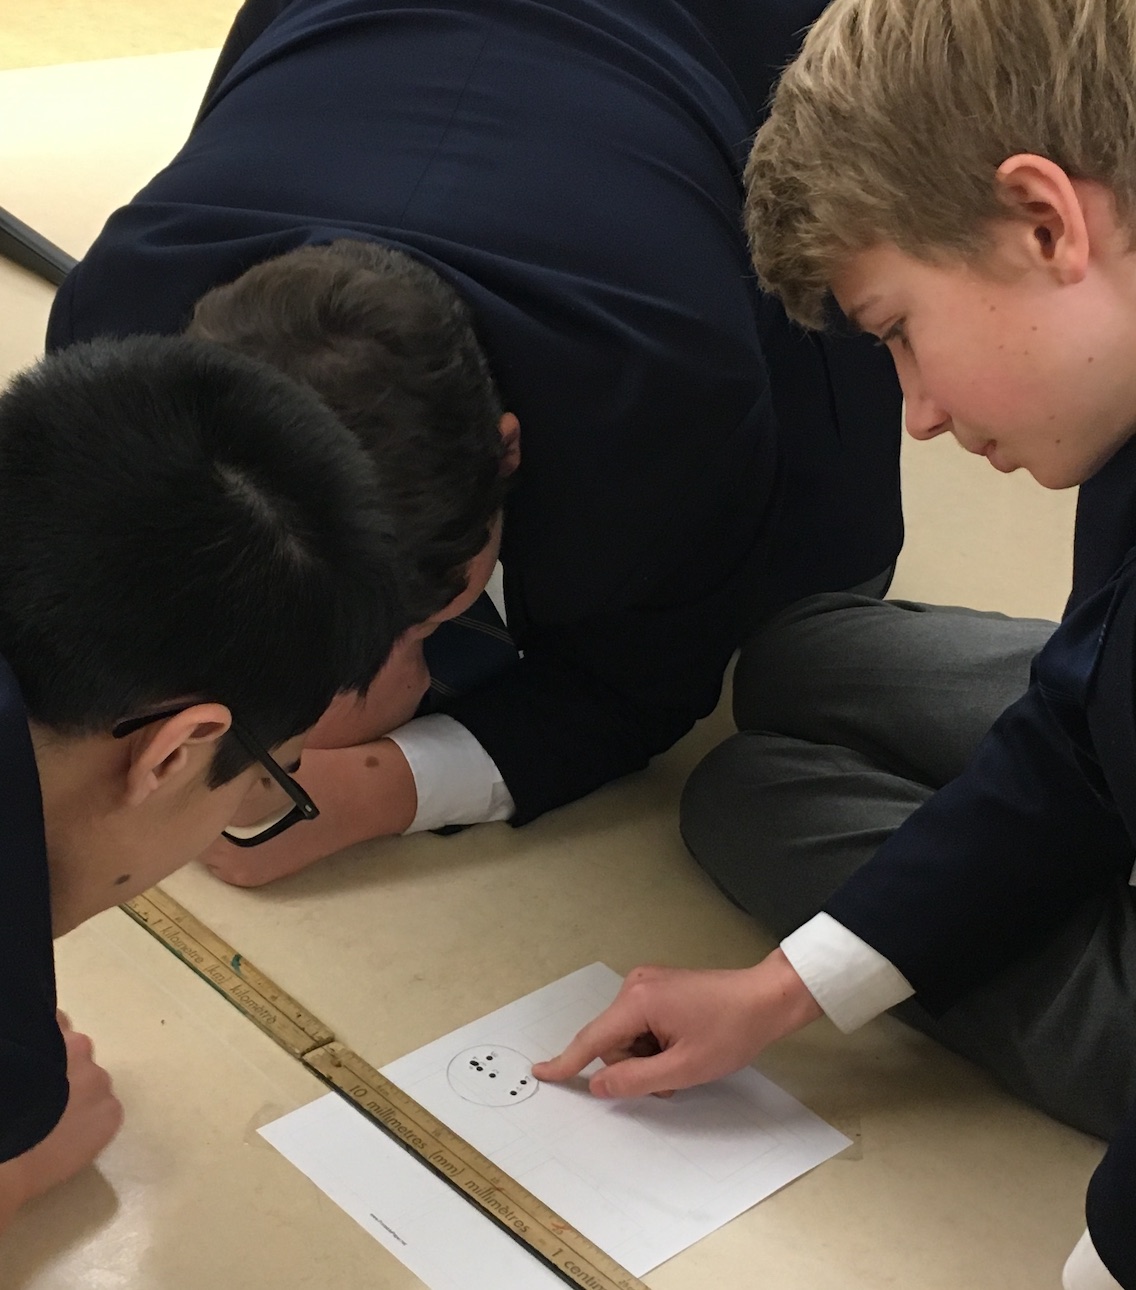
Where is that ball landing?
After the dropper has become consistent, it's time to determine exactly where the ball is hitting the ground.
And another step in the process:
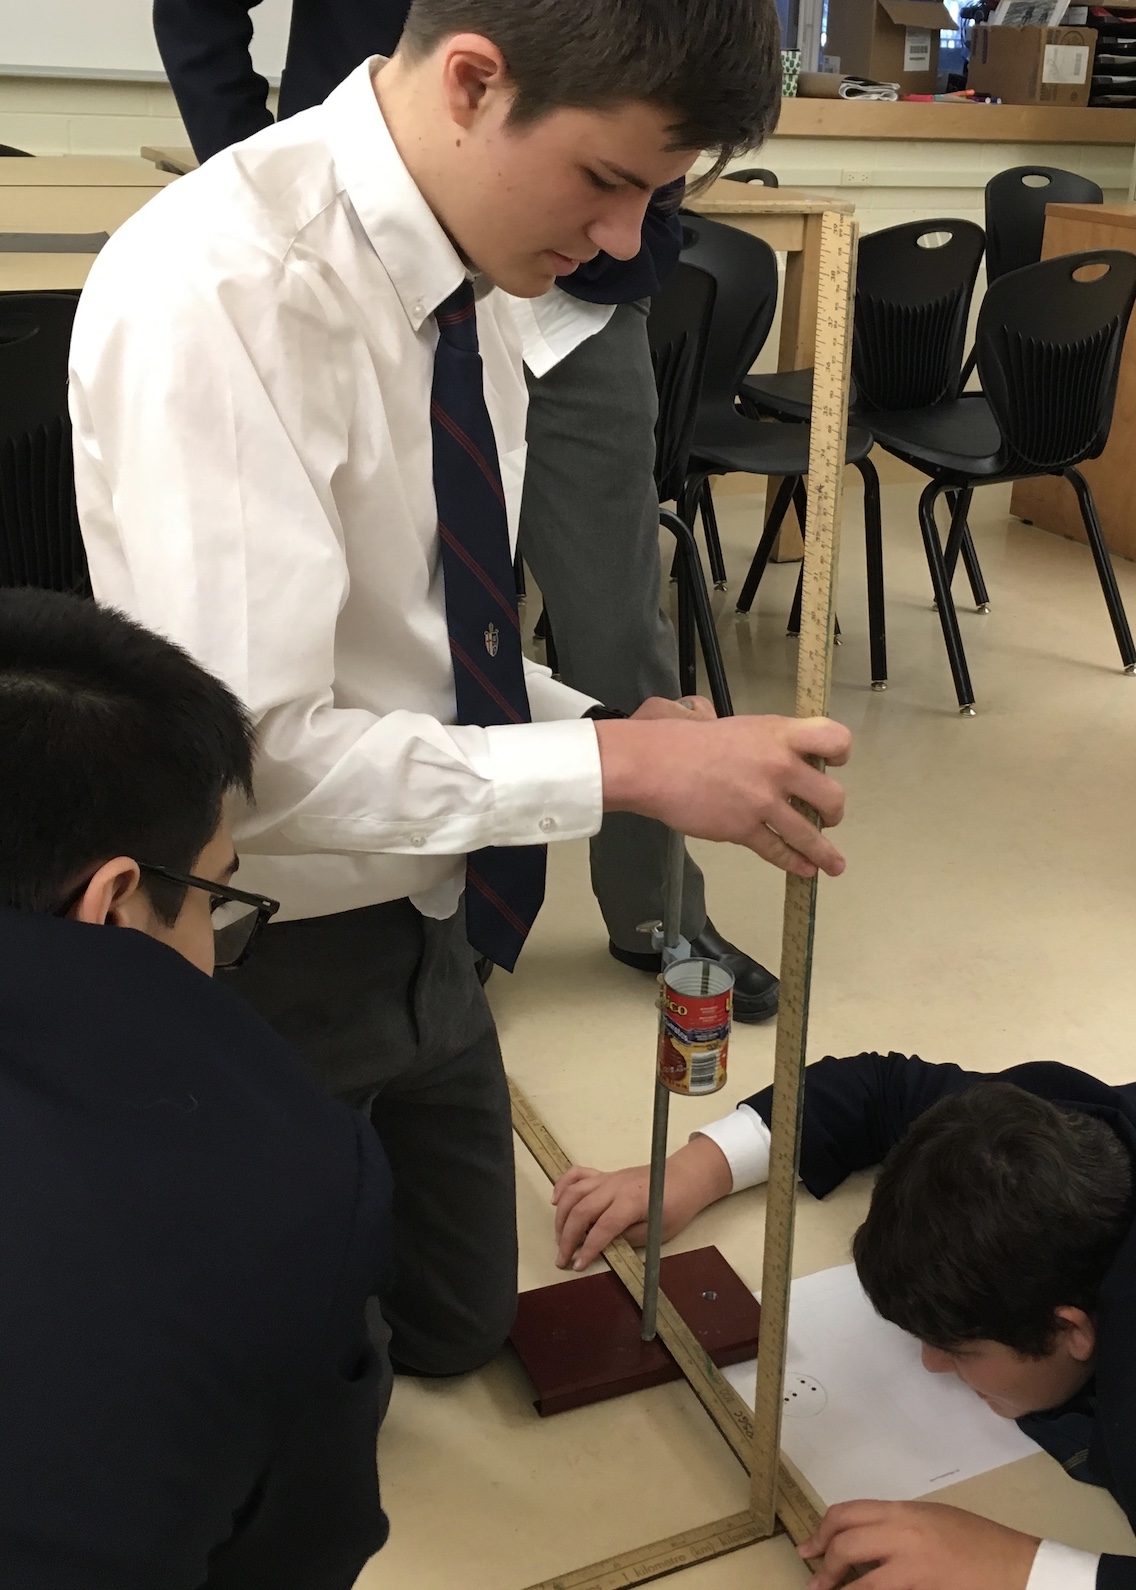
What's the height of that can?
Once students have a mathematical model to describe the flight of the ball bearing, they must determine the height of the can. What would the next step be?
Note that should your classroom be carpeted, you'll need a thin, firm board to place beneath the paper and carbon paper – otherwise the ball bearing will be too cushioned upon impact to allow the carbon paper to make a mark.
Assessment
I have sometimes assessed student work on this task, and sometimes run it simply as a consolidation activity before a major holiday during the school year.
The task is ripe for recording observations and conversations or assessing learning skills.
Recall the seven mathematical processes in Ontario mathematics instruction:
- Problem Solving
- Reasoning and Proving
- Reflecting
- Selecting Tools and Computational Strategies
- Connecting
- Representing
- Communicating
The prompts given in this document can be helpful in guiding your students as they complete the Ball in a Can Challenge.
Before the task begins, I've sometimes told the class that later on, they'd each need to author a short reflection, answering these four questions:
- Including a diagram, organize and explain the mathematics used by your group to obtain a successful result.
- What went well in your group's effort to land the ball in the can?
- What would you have changed about how your group completed the activity?
- Evaluate your own participation in the group. What were your contributions? Were you an effective team member?
In some years, a day or two after the task itself, I've given a quiz or test question where a diagram is presented along with key measurements, and then each student must individually solve and explain the problem once more.
Final thoughts
The groups that are most successful are those that can communicate calmly and effectively with one another.
Don't permit students to work by trial and error, or "eyeball" measurements. This short-circuits the rich conversations that will ensue when a quantitative approach to problem solving is used.
It can be a real drag if a group doesn't land the ball bearing in the can on the first try.
With a small nudge to reconsider some part of their approach, I've never had a group fail to land the ball in the can on their second try.
Success!
A small group of four students at Lakefield College School ace the challenge.
The Ball in a Can Challenge takes time to set up, but the payoff for your students will be worth it.
- Nils Ahbel outlines this very well in Reflections on a 119-Year Old Curriculum. The content of his talk is well worth looking past the less than ideal audio quality of the recording. ^
- The Greer conference at PEA deserves to be explicated in its own article. Here's the short version: if you're a math teacher, go. Find a way. You won't regret it. ^